Introduction - What is the Geo Web?
Edited 6/12/2022 to bring it up to date with Cadastre V2.
The Geo Web is a neutral, open-source set of protocols that serve as a bridge between a shared digital world and the physical world. This bridging is achieved by using a digital land registry in conjunction with blockchain technology to anchor digital content to physical locations in the real world. This can create a shared, augmented reality layer that ‘overlays’ what exists around us.
Augmented reality platforms already exist, but are largely proprietary. Niantic is one example of this - with Pokemon Go being their most well recognized augmented reality game. There’s nothing ‘wrong’ with a proprietary AR layer, per se - but it puts all the power in the hands of a few. Only Niantic can control where PokeStops are placed and only Niantic can control who can connect to their shared augmented reality layer.
The Geo Web is a public good augmented reality platform, created as an open resource that anyone can build upon without exclusion. This can be used for games, art, education, business, or any number of other uses. With the growing emergence of metaverses built on blockchain technology, the possibilities are nearly endless.
Click here to jump straight to instructions and get started
Current Use Cases
The Geo Web at its core is built to share media with anyone within a physical geolocation. One of the most basic use cases is integration into geocaching.
Geocaching is an outdoor recreational activity that involves participants hiding containers (called geocaches or caches) at specific locations throughout the world and challenging others to find them. Typically these caches are small, waterproof containers that contain a logbook listing those who have found it, as well as some small toys or trinkets for trading.

Using the Geo Web, participants hiding a geocache can claim the digital plots surrounding the area and incorporate treasure-hunting clues. Those clues would only be visible through a spatial browser when the seekers are physically in the area - allowing for extended treasure hunts that lead across multiple digital plots.
The Geo Web can be used for any kind of media or data that is location-specific - concert information linked to a venue, restaurant menus linked to the restaurant location, and art gallery information linked to an exhibition are all examples that are currently possible.
Future Potential Use Cases
The Geo Web is currently in a relatively early stage of development. As such, we can think of many more use cases that are possible in the future than exist at this point in time.
One such example is an AR/VR game similar to Pokemon Go, but built on the Geo Web instead of a proprietary closed system. In such a game, digital land plots could be leveraged by the players themselves or by interested business owners who want to attract the players to their business. A cafe, for example, could provide buffs or in-game items to players as a means of enticing them into the physical business.
Getting Started
So, ready to dive into the world of the Geo Web and claim your first plot?
First things first - you will need a basic crypto wallet that can access the test network (testnet).
While the Geo Web is undergoing core development, it exists on the Optimism Kovan testnet. Optimism is a ‘Layer 2’ blockchain network that is built to run in tandem with Ethereum (often called Layer 1) - retaining high security while vastly reducing the transaction costs. Being on a testnet allows transactions of land and sales mechanics to be tested without the cost of mainnet assets, as testnets wallets can receive valueless cryptocurrency from ‘faucets.’
Setting Up A Crypto Wallet
Your crypto wallet is where all of your cryptocurrencies and NFTs reside. It also serves as an identity of sorts, letting you connect to services that integrate blockchain technology without requiring a new account for each and every service.
When interacting with websites or services that are connected to the blockchain, your wallet will pop up and ask you for approval to transact or connect to the service. It is vital that you tread carefully with approving transactions - if you don’t recognize what the website is trying to do, don’t approve the transaction.
There are several options for crypto wallets with various features. For right now, we’re going to stick to a fairly well-known one named MetaMask that exists as a web extension for all mainstream web browsers.
Installing MetaMask
To start, visit MetaMask’s website - https://metamask.io.
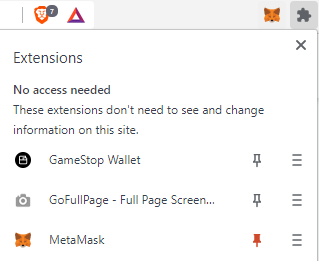
Click “Download Now” and it should automatically select the proper browser version. If not, select your browser and follow the prompts for installing it. If you’re on Chrome or Brave, once it’s installed you can ‘pin’ MetaMask to make it always visible in the web browser. Do this by clicking the puzzle piece and then clicking the ‘pin,’ as seen below.
Click the MetaMask icon to open a new tab and begin the process of setting up the wallet. Press “Get Started” and get a pen and paper. On the next screen, press “Yes, let’s get set up!” to begin the process of creating a new MetaMask wallet.
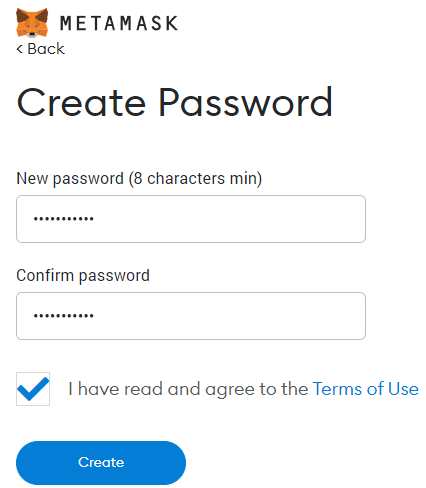
After you create your password, MetaMask will secure your wallet using a secret recovery phrase. Using your pen and paper from earlier, write down this 12-word phrase and store it somewhere safe. This phrase can be used to recover your wallet if you ever forget your password, need to install MetaMask on a new computer, or need to reinstall the extension on the same PC.
NEVER share your secret phrase. Anyone that has it can access your wallet and steal all of your digital assets.
Additional safety practices for secret recovery phrases can be found here: https://www.ledger.com/academy/hardwarewallet/best-ways-to-protect-your-recovery-phrase
Connecting To Optimism Kovan Testnet
The Geo Web currently resides on the Optimism Kovan Testnet. To claim a parcel, we need to connect our newborn wallet to that testnet.
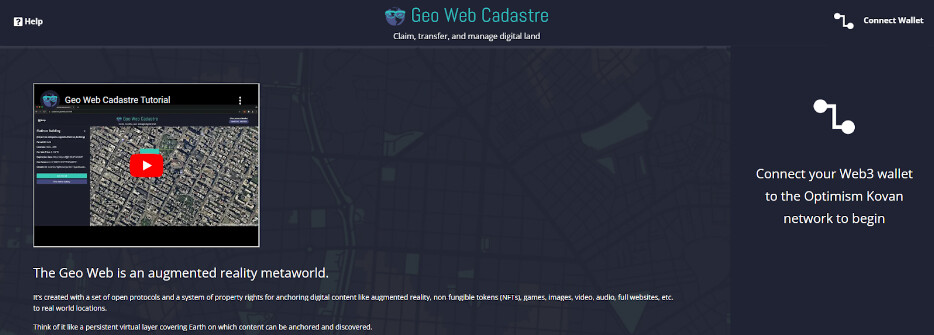
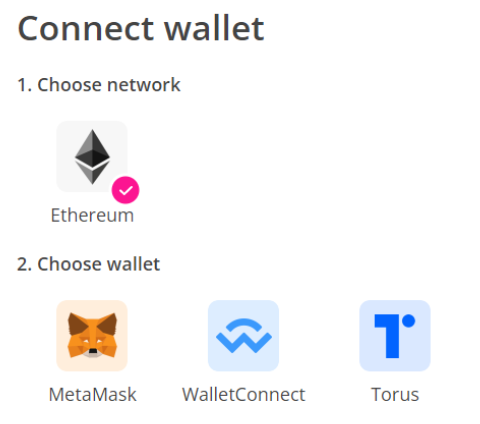
Head over to the Cadastre webpage and click “Connect Wallet” in the top right.
This will initiate a pop-up asking you to choose a wallet. Select MetaMask and it will prompt a pop-up asking if it can connect an account to the website. Click next and then review the permissions it’s asking for.
It’s important to always pay attention to this when connecting to websites using your wallet, as granting the wrong permissions to the wrong website can lead to lost assets.
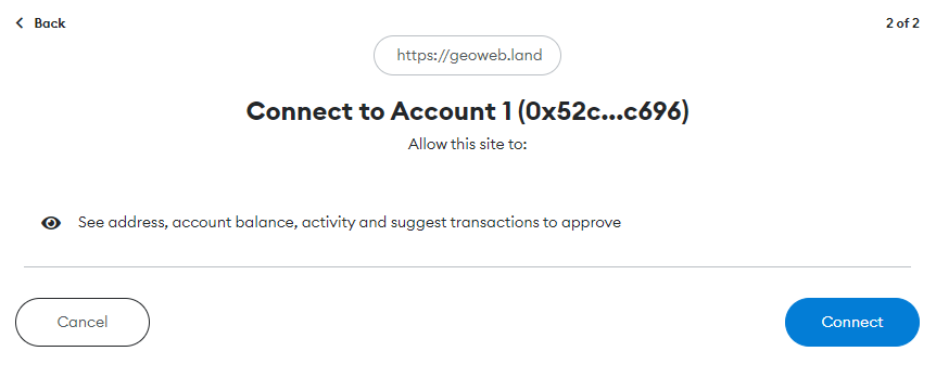
In this case, geoweb.land is requesting permission to see address, account balance, activity, and suggest transactions to approve - which is fairly standard.
It will immediately initiate another MetaMask pop-up requesting to add the Optimism Kovan test network, where the Geo Web testnet exists while under core development.
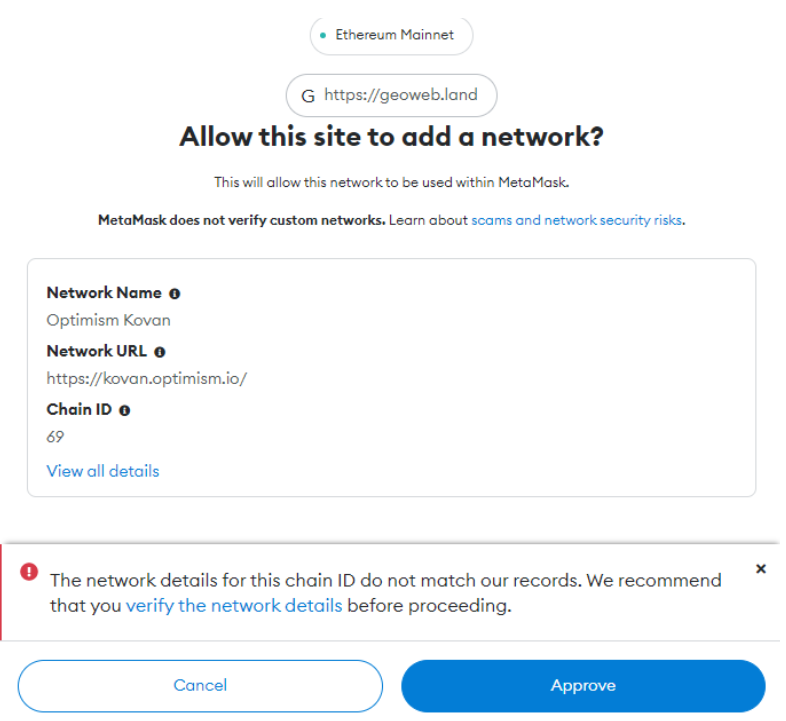
Optimism Kovan is a testnet for a Layer 2 solution called Optimism, which is built to run in tandem with Ethereum while allowing cheaper transactions. Select “Approve,” and then select “Switch Network” on the following screen. It will then ask for approval to sign in with your Ethereum account, allowing you to publish and manage Geo Web Content on the Ceramic Network.

Loading Your Wallet
Because our new MetaMask wallet is connected to the Optimism Kovan Testnet, we can add a special version of the ETH cryptocurrency to the wallet using a service called a “Faucet.”
To do this, visit this website and click “Sign In with Twitter,” then follow the instructions to connect it to your Twitter account: https://faucet.paradigm.xyz/

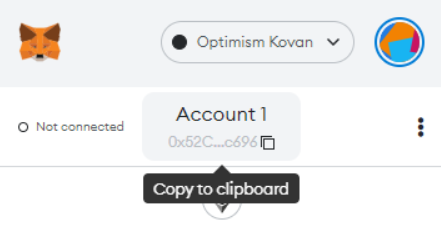
When you’re done, open the MetaMask extension and click “Account 1.” to copy the address to your clipboard.
Paste that address into the “Request Tokens” section. Select the checkbox that appears below the address field, then claim your tokens. You can do this once every 24 hours.

Once the transaction is initiated, it can take several minutes to clear. A pop-up will display once the transaction clears and the wallet will display 1ETH.
Important note: The above MetaMask wallet and address were created fresh for testing purposes. Be careful of where you expose your blockchain address on the internet.
Getting Phygital - Digital Land Parcels
Now that our wallet is loaded up we’re almost ready to claim our first digital plot.
All land in the Geo Web uses a property rights system called ‘Partial Common Ownership.’ This system follows two basic rules:
- Every claimed parcel must be listed for sale when claimed
- An upfront license fee (based on list price) must be paid to claim each parcel
License fees are currently 10% per year on an ongoing basis in the Geo Web testnet.
This system helps prevent squatters and malicious actors from claiming a digital parcel and preventing others from using it. The owner of the plot is incentivized to produce value equal to its worth or someone else will come and purchase it from underneath them. Because the license fees are based on the sale price, it disincentivizes squatters from grabbing large amounts of land to hold land without any intent to sell.
It’s a little different from traditional property rights - the page on Partial Common Ownership found above goes into more detail.
Head back over to Geo Web Cadastre and click “Connect Wallet” then choose MetaMask from the pop-up menu.
The website may initiate a MetaMask request for approval, depending on how long it’s been since the last visit. If so, verify it was requested by geoweb.land and approve it.
We/re nearly ready to claim our first parcel. For the moment, I recommend claiming a digital parcel of somewhere nearby so you can test your connected content with a spatial browser.
Zoom in and navigate to an unclaimed area. Click once to start selecting an area, then move the cursor to adjust the selection size. The second click will finalize the size and open the Claim interface. In the screenshot below, the yellow section is selected while the blue section is claimed.
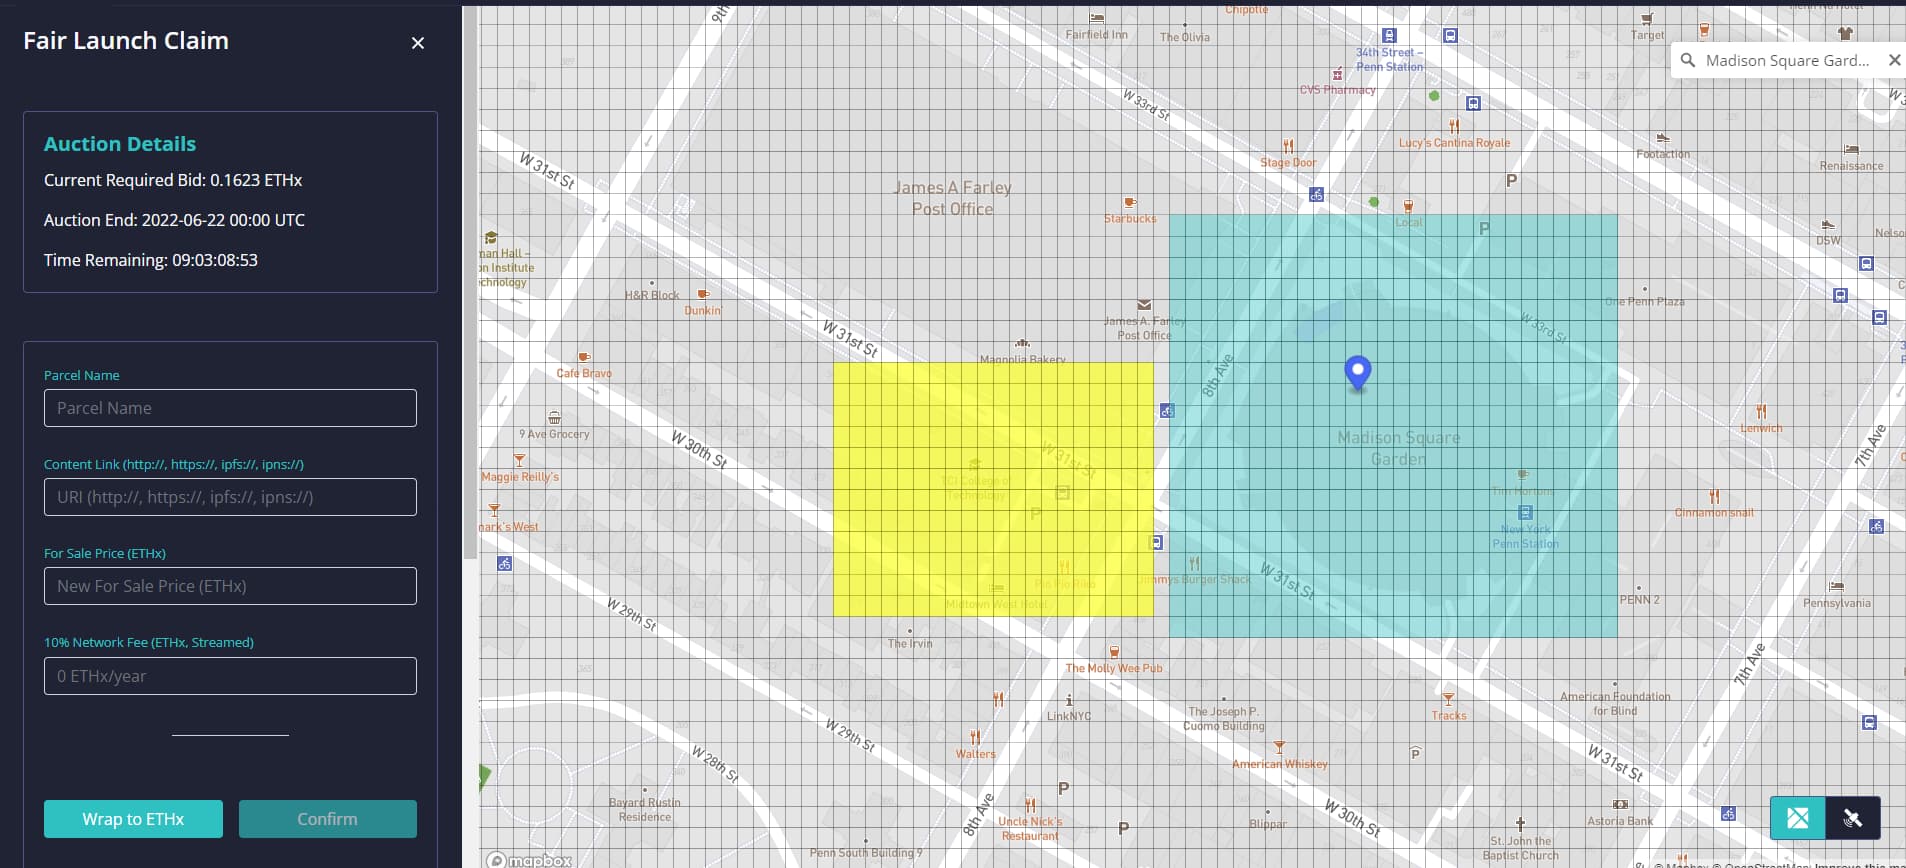
The tab to the left is the “Claim” interface.
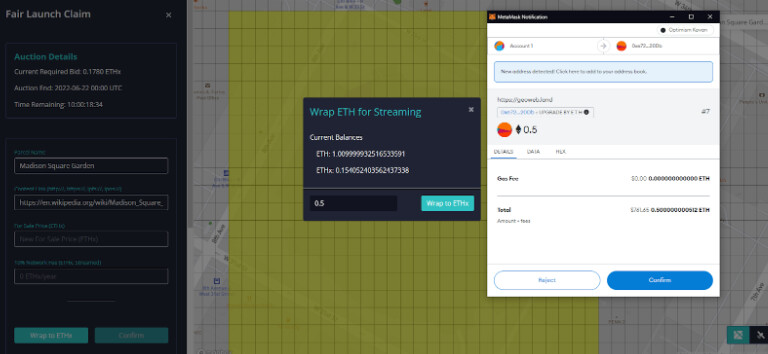
Before we get to the other fields, we first need to exchange our ETH for ETHx. This allows for streaming payments that are automatically deducted over the duration of the license. We’re going to change half of the ETH we got from the faucet for ETHx.
Click ‘Wrap to ETHx,’ then enter 0.5 and click ‘Wrap to ETHx.’ Confirm the transaction in MetaMask when it pops up. Once the transaction has completed, you should have around 0.5 ETH and around 0.5 ETHx.
Now that we have ETHx, we can claim the plot. Insert a name for the plot and a ‘For Sale Price (ETHx).’ The license fee will be 10% of the For Sale Price per year, streamed on an ongoing basis.
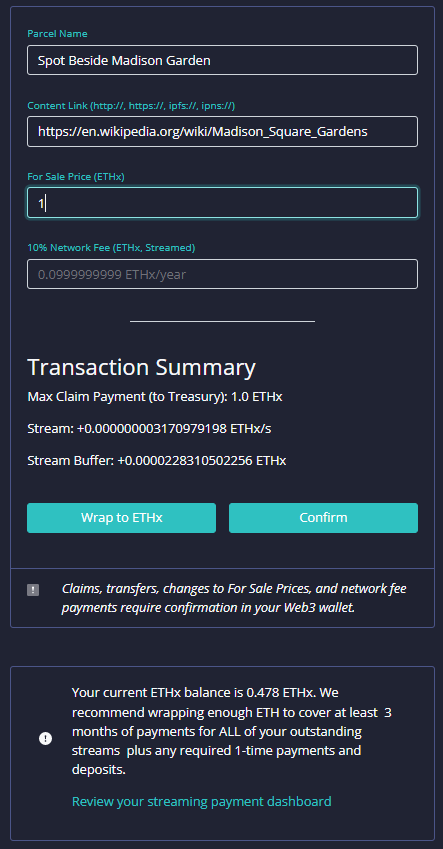
Put in 1 for the ‘For Sale Price,’ then click ‘Confirm.’ When the MetaMask transaction initiates, confirm that as well.
Tada! The test parcel is now yours. If anyone wishes to buy it from you, they must pay the listed For Sale Price (1. ETHx) plus your remaining Network Fee Payment.

Using either Edit Parcel or Edit Media Gallery, you can connect a website or other forms of media to that physical location, which will then be viewable using a spatial browser.
If you previously claimed your home address using this process, you can now pull up an early version of a spatial browser and it will display that website or media. Since it’s based on location, you’ll need to grant location access to your browser! Play around with it - set up a different website for every block on your walking path, for example.
That’s it! When the Geo Web launches its mainnet it will have real associated costs with claiming each parcel, but for the moment you can reload your Optimism Kovan Testnet connected wallet from the faucet and keep claiming as much land as you want.
Have a question? Join the Discord, and let us know!